Jay Laverty
Makes a
Sherman Mark Ill
of the Royal Wiltshire Yeomanry, Syria 1943.
In 1:35 scale


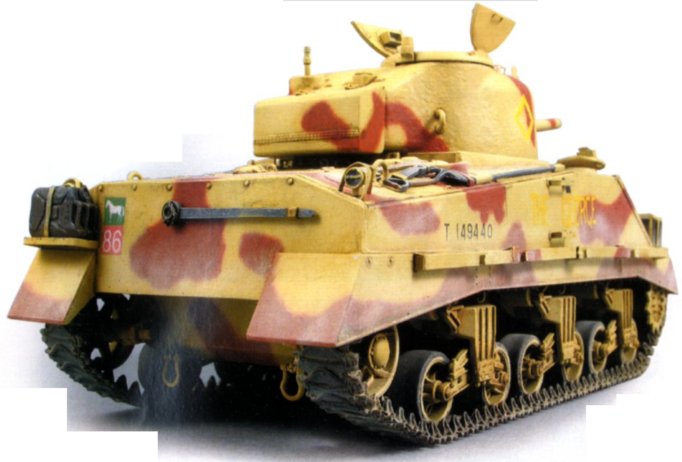
The finished model.
The original tank, THE GEORGE, belonged to the Regiment Headquarters Troop and was used by the second in command of the Regiment and its main armament removed and replaced by a dummy wooden gun barrel. A Jordio Rubio turned aluminium barrel is fitted here.
Note the combined 9th Armoured Brigade white horse on a green square badge and the Arm of Service number next to the drivers hood.This marking was produced on Hamnant’s clear glossy decals paper, printed on an ink jet printer from Ken Jone’s original artwork.

Most of the Brigade's tanks had a rack for POL/water containers 0n the right font trackguard.
We have certainly seen the bar being progressively raised over the last couple of years, with some truly outstanding releases from all of the major manufacturers, which seem to improve kit over kit. It seems that the traditional injection kit is no longer the mainstay it used to be and people like Dragon and Tamiya, especially Dragon, are including plenty of parts that would normally have been the forte of the aftermarket crowd.
I guess Gunze Sangyo started the ball rolling with their impressive ‘Hi-Tech’ range some time ago and everyone else has since responded in kind. The Dragon M4A2/76 Sherman ‘Red Army’ certainly fell into the ‘high tech’ category and it is this I chose for my base kit. It is all in the box – turned aluminium barrel, photo-etched metal parts, a revolutionary new type of flexible track that can be glued with regular cement and, my personal favourite, clear parts for the lights and periscopes. Having a look through the contents reveals a high level of plastic moulding and the degree of detail is impressive.
There are, of course, the standard downfalls to any Dragon Sherman, as I am not particularly fond of the return skids now, that for some unexplained reason, they have chosen to remove the bolts from, which were a nice touch on the 2nd run of the Firefly kit. They have also followed Tamiya’s example with some recessed weld seams that will not be difficult to fix unless you wear gloves when you model. Otherwise all of the angles measure up nicely and this tank will certainly look like an M4A2.
I was particularly impressed with the look of the bogies and this is the first time I have seen a manufacturer correctly capture the curvature of the suspension arms, as they bulge slightly outward as they extend towards the wheels. I chose the VLS TRAKZ kit for this conversion and this is a superb effort and although there was a bit of slight warping and a slightly bulbous front glacis, I was very impressed with the detail and the crispness of the resin casting.
The texture on the turret is nicely done as is that on the engine deck. I imagine it was originally designed to be a Sherman in US Marines service in the Pacific theatre, I decided to turn it into a Royal Wiltshire Yeomanry, 9th Armoured Brigade, Sherman Mark Ill in Syria, 1943. This meant that I would have to source several components from various kits and, in the process, create many spares for future Sherman efforts.
The TRAKZ conversion kit is recommended for the Academy M10 series or the Tamiya M4, but I chose to use Dragon’s M4A2, as I was quite anxious to get tucked into it.
Yet again … !
We start with the suspension.
Firstly I needed to source some wheels from an Academy kit, as they are my personal favourites having grease nipples included on them, and got to work ‘distressing’ them, as seems to be the vogue term for it. I call it ‘hacking them up with a scalpel, then sanding them with a sanding stick’ but that is far to long a title and it doesn’t have a cool ring to it. The rest of the Dragon suspension is excellent, having lot’s of nice casting numbers all over, that will cry out for an ink wash, but as I alluded to earlier the return skids will need replacing. Out comes the 2nd edition of the Dragon Firefly and off come the track return skids.
The two halves are assembled and sanded, then the roller wheel housing can be cut off and callously discarded. With a bit of sanding and shaping they were easily be modified to fit the newer bogies. Before these were fixed to the bogies, however, I drilled the holes for mounting the return roller housing on the outside of the bogie.
These were a universal fitting on Sherman VVSS and, curiously, the only time I have ever seen them depicted was on the 3rd and most recent Dragon issue of the VC Firefly, (coincidentally done by my favourite military artist, Ron Volstad).
It’s a simple technique; I used a pin vice and the smallest drill bit in my box, the rest you should be able to figure out from the picture. Of course whether you bother or not is up to you, as I imagine these holes would quickly become filled with mud and battlefield debris, and would not be visible.

This has been my standard procedure for Sherman bogies for quite some time now. Dragon bogies and Academy wheels. Although it isn't a perfect solution, in my opinion it is one of thee best.
The return skids are fitted and the assemblies put aside to be attached to the hull later. The upper and lower hull parts were mated and the details added.
The fit of the Dragon hull and the TRAKZ conversion is surprisingly good, considering it was designed for the Tamiya kit primarily, as I noticed when it came time to fit the mudguards. This fact is a testament to the accuracy of dimensions on both accounts.
The Aber set I mentioned earlier featured heavily in the external details department. After fitting the rather superb clear moulded headlights provided in the Dragon kit, and painting the back’s with my trusty 15-year old pot of Model Master Chrome Silver, I fitled the three-part headlight guards.
After fiddling with the parts and super-gluing the anns to my hands on more than one frustrating occasion, I vowed not to be lazy and get out the soldering iron next time. At this point the model slowly deteriorated into an organized chaos as the required parts were simply fished out of the spares box as they were needed. In fact, the only time I found myself referring to the instruction sheet at this point was to find the etched parts on the Aber set!
The Dim and the Dummy Gun
One problem I experienced was the dummy gun.
After rushing into the turret construction and fitting a Jordi Rubio turned aluminium barrel, when I didn’t really need to, Ken told me that THE GEORGE, being an HQ tank had a dummy gun fitted to leave the interior of the turret clear for maps and other paraphernalia.
I think the solution would be to fill in the end of the Tamiya kit’s barrel and fitting that to the front, leaving the small ‘gap’, that is visible in the photograph I was working from. Otherwise it will mean that crew of THE GEORGE created one very convincing dummy gun! I haven’t fitted it, yet and I’ve left the slot for the co-axial machine gun clear too.
The next problem I had was the tracks. In the picture it is not clearly visible which type if track is on THE GEORGE, so some speculation is required. After studying the vast array of photographs that our respected editor sent me via Peter Brown, I saw that about 95%, of the tanks in the unit were fitted with type 61 British Chevron tracks so that is what I will use. My options are those found in the Dragon Firefly kits. (Nope!) The very complicated and time consuming, yet perfectly detailed Model Kasten ones? (Nope!) Or, my personal favourite, Trackpax from our friends at Accurate Armour. (Yes!)
Terrific Trackpax
I first used AA’s Trackpax on my Sexton article that you may remember from a previous issue of Mil Mod, (Vol.34 o.7) and was smitten. (It will take me longer to write this section of the article than it takes me to fit AA Trackpax to the tank.)
Once the suspension was in place, except of course, the drive sprockets, the track can be fitted. Cutting the track itself from the casting block is very simple and involves nothing more than running a scalpel carefully across the length of the seam. Cleaning up is equally simple as I simply brushed a scouring pad downwards over the edges, thus removing any resin ‘flash’.
Three lengths are then joined using super glue and formed using a hairdryer. The form must be made as much as possible before the drive sprocket is added, otherwise one runs the risk of melting the teeth! All the surgery that is necessary is cutting a five-link length of track and filling the remaining gap in the links. There you have it. Done!
Accurate Armour’s Trackpax, in my opinion, combines everything into one easy-to-use package. The level of detail is great and if you want to make a gap between each link, this can easily be done using a panel scriber. (If you don’t have one just ‘steal’ it from the toolbox of a mate’s. who builds aeroplanes.) All in all, about an hour’s work and if you had ever seen me type you will know I am not lying when I said it would take me longer to write this description than to fit the tracks.

ABOVE LEFT: Perhaps the easiest way I have found of cutting resin is with a scribing tool. especially when it comes to circular edges. Tlte access hatches were a tad tricky as the angles for cutting proved a bit problematic. ABOVE RIGHT: The more hard-core 'Shermanoholics' out there will recognize the Tamiya M4 plate across the front, joining the TRAKZ hull to the Dragon transmission cover. Even then I had to add a strip of plastic card.
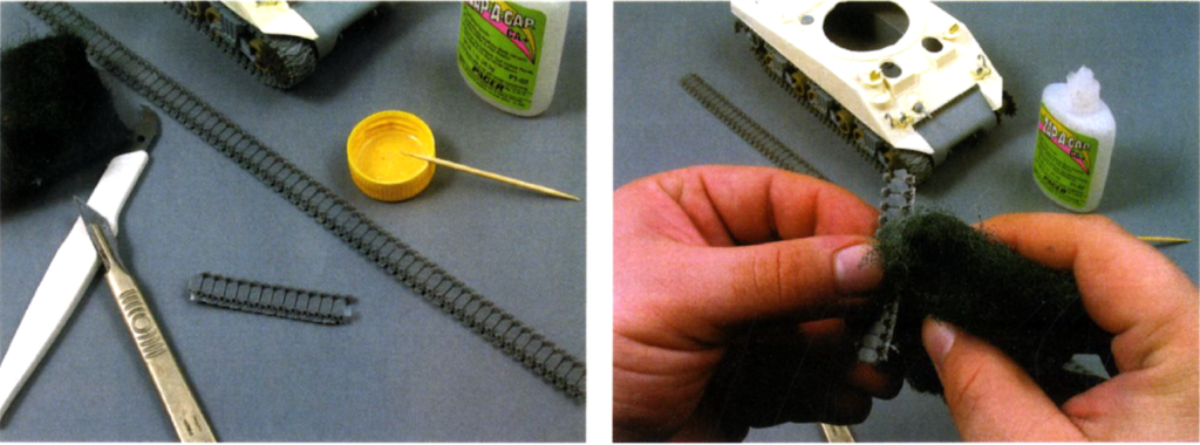
ABOVE LEFT: Some of the tools I use when working with Accurate Amour's TrackPax. The kitchen scourer is all that is needed to clean up after cutting them away with a scalpel and/or a scriber. The purpose of the glue is hopefully obvious ... ABOVE RIGHT: A graphic illustration of what my wife's scouring pad gets up to when she's not looking.

ABOVE: A very tricky operation as too much heat 0n the plastic parts will cause them to become deformed. However, when done properly it is a very fast and effective way to form the track to the suspension. I recommend using a dummy part for the drive sprockets.

ABOVE: Just four of the drive sprockets available to provide an example of the difference between them. From left to right, Academy, AFV Club, Dragon and finally Tamiya. Two types and four completely different interpretations!
Persistently Pilfering Parts
It’s a good thing that I have so many Sherman kits sitting around with parts missing, taken in previous Sherman builds, that can yield such a bounty of useful components. Nothing aside from rubbish parts goes to waste in my modelling loft!
The latest victim is the Tamiya M4 early production model, which has already contributed generously to this model, having previously surrendered it’s mudguards. They really are a nice rendition, full of plenty of rivet detail as well as having the lip that is noticeable along the bottom of the guard. Now the last major construction job can be completed, with the stringer fittings being added. I pilfered these from an Eduard set designed to be used on the Tamiya Grant. The fit is almost perfect and the look is right when they are on.
When I was building the model I was waiting for some parts to arrive from Model Point in the US where 1 had ordered US tow cables, and as these will feature predominantly on this model, I decided to go for a quality one. 1 had heard good things about this particular set from Polish manufacturer Karaya, and I can say I wasn’t disappointed. After priming the extremely flexible and contour holding cable, it was left to one side to be added later. There was a lovely little surprise included with this that I will mention and describe in detail later.
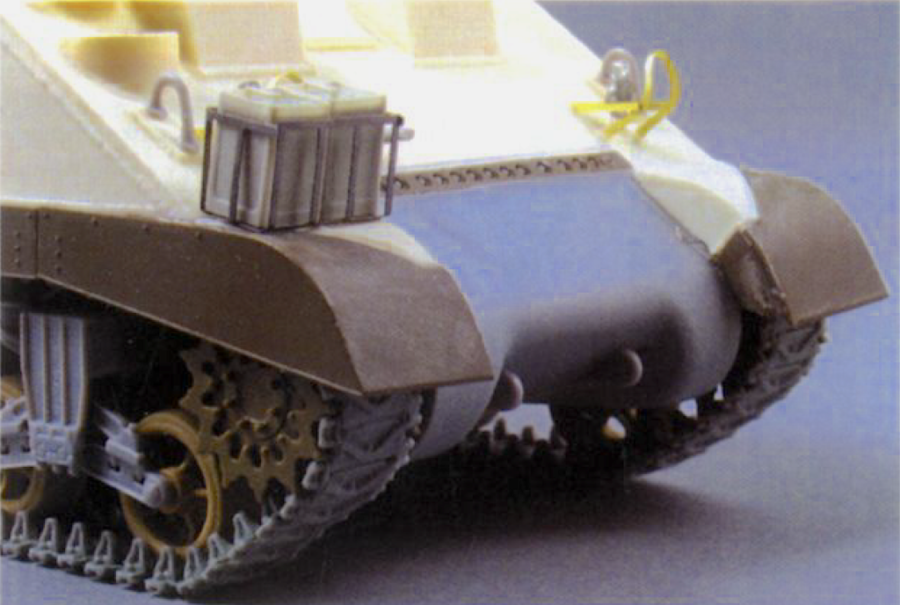
ABOVE: Looking at the front of the tank shows the mixture of components that went into this model to good effect. Aber, Edward, Accurate Armour, Dragon, Tamiya, and Academy all had some input in this model.

ABOVE: Combining several equally excellent components from several different sources is 0ne way of ensuring the look you need. In this one shot alone there are five different manufacturers' products.

ABOVE: With the front of the lights masked the backs are painted with Chrome Silver. A simple way of creating effective looking lights

ABOVE: A close look nt the light assembly immediately prior to its painting. Already it looks pretty convincing.

ABOVE: Accurate Armour to the rescue again this time in the shape of two separate sizes of POW, or 'flimsy' can. If you build British subjects and don't keep a stock of these on hand, you are missing out big time.

ABOVE: A shot of tire model with the construction phase completed. I was pretty pleased with the build at this point although there are a couple of less than perfect points.

ABOVE: I think these are the only scratch built items on the tank, and don't really warrant mentioning as they are only cut lengths of spare etched metal cut and bent to shape.
Perfect Primer
I have a couple of primers that I like to use on my models and it all depends on how quickly I feel like working as to which one I use. Here I opted for Alclad grey primer as 1 didn’t want to obscure any detail and I was in no hurry to complete the model. Besides, I was still waiting for the transfers to be completed!
Spraying with Alclad is a technique that is tricky to perfect but once mastered, can effect some truly stunning results. Just remember a face mask is an essential piece of kit, as the superfine properties of the primer mean a mist is inevitably created, however low the pressure on the compressor may be.
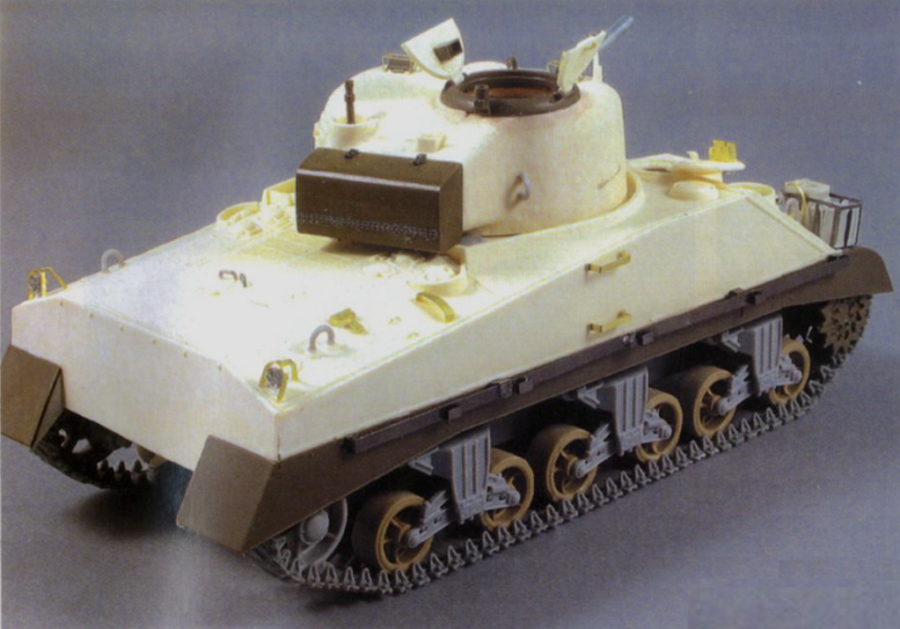
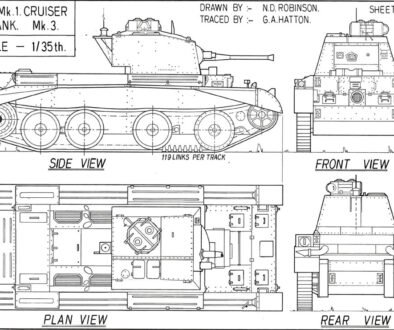
ABOVE: I forgot to mention in the earlier caption that even Italeri had a say in this model in the form of a Crusader stowage bin that became surplus as part of a Crusader Mark 1 build I am working 0n (long term) for Mil Mod at the moment.

The virtual tour of the construction continues....
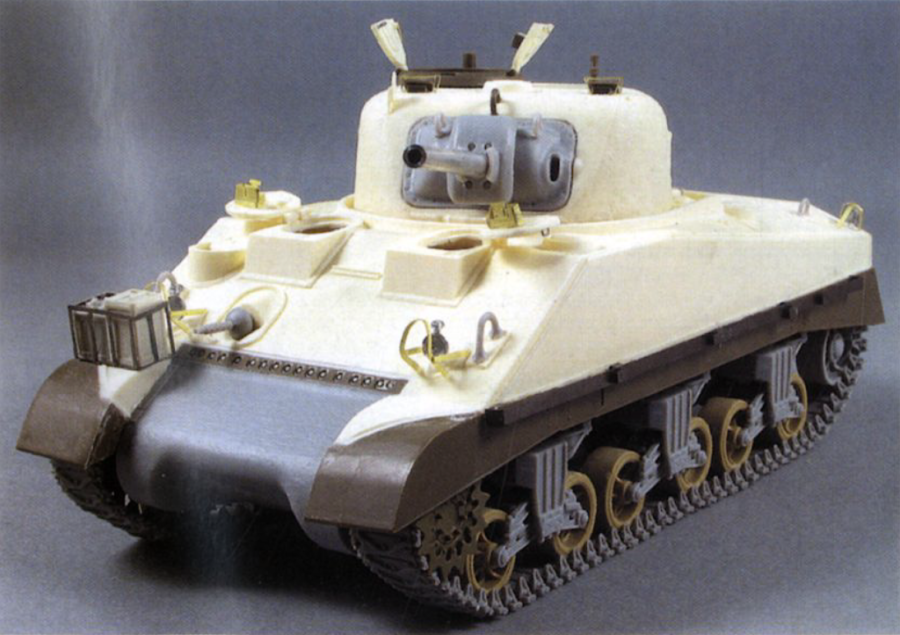
Bored yet? Neither am I! If you look really close you can see the other 'scratch built' detail in the form of the hatch handle - from bent fuse wire.

ABOVE: I noticed on several different moving pictures and stills that Peter Brown sent me that a lot of the Wiltshire's Shermans had this field mod - a jerrycan holder and here it is, as if by magic.
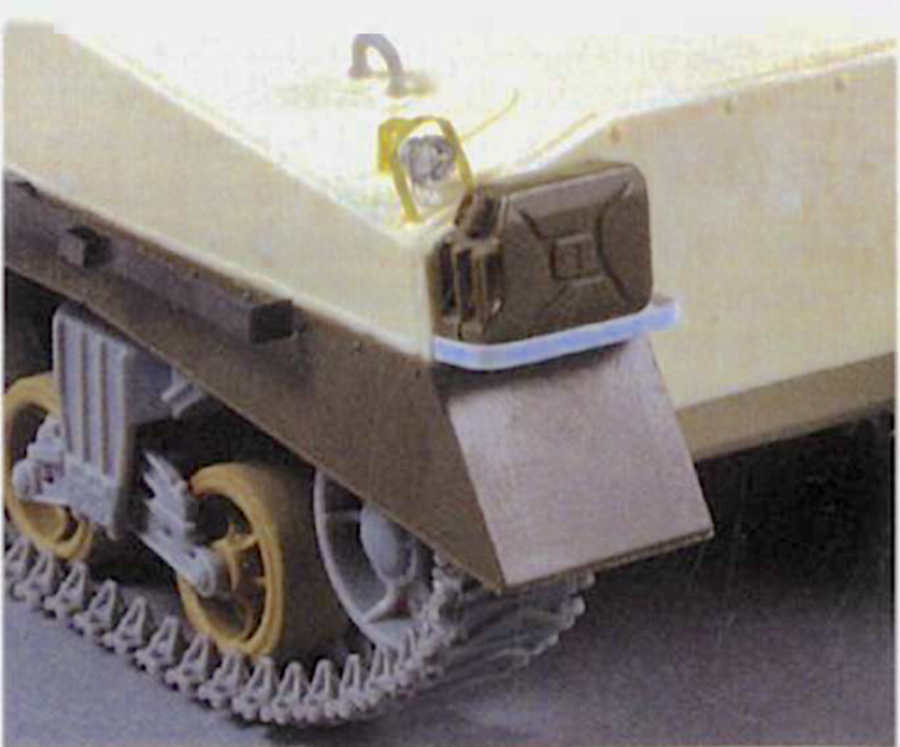
ABOVE: Jerrycan!
Painting
There was some room for interpretation when ii came to painting and through all of the efforts of Peter and Ken I have narrowed the likely colours down to Light Stone and Terracotta. Both were in use in Syria at the time of the 22nd October march-past in front of Lieutenant General Sir Desmond Anderson these vehicles took part in and also match up with my eyes’ interpretation of the colours in the original black and white photograph(s}. If I’m (we are) wrong, oh well, I won’t lose any sleep over it, but I would love to see someone prove irrefutably otherwise.
Recently Xtracolor have released X821 Light Stone, which will be the base colour for this model. It is a perfect match for the 85 colours mentioned in the wartime documents pertaining to this theatre (as well as being cross-referenced with some superb prime source material researched by Mike Starmer on the subject), and I work best with Xtracolor.
It may take a slightly longer time to dry than acrylics, but the spraying characteristics arc far superior. The Terracotta will have to be done as a Humbrol mixture (laid out by Mike Starmer again) and the recipe can be found on the excellent MAFVA Website. I am not the greatest fan of I Humbrol paints, and only use them as a last resort, however, I must say my experience with them here was not all bad.
It started out poorly as I was finding a lot of over-spray and the paint seemed to be ‘chugging’ out of my Aztek. I thought that since it was very cold in my loft this could be having an effect on the airbrush, although it had very little effect on Xtracolor.

The best primer I've ever used. A little patience and a good compressor are mandatory for using Alclad, but the results are spectacular.

The base coat of Xtracolor Light Stone has been applied and awaits the terracotta mixture made using Mike Starmer's reference work available from the MAFVA Website.
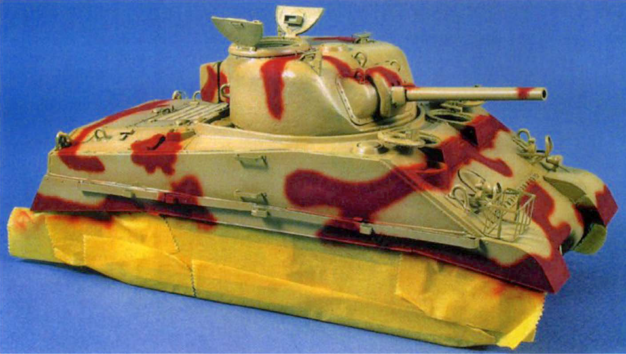
ABOVE: Tamiya tape was used to mask the tracks in order lo keep them from being splattered with Terracotta. This picture greatly illustrates the difference between Humbrol and Xtracolor. Humbrol has a dead matt finish while Xtracolor has a slight 'sheen' to it.
Heated Sessions
I keep a hair dryer handy as I use one to form resin parts, and it came in very handy here. I simply laid the hair dryer on the carpeted section of the floor, placed the paint tins directly in front of it and let it run for a couple of minutes. Once the tins are hot to the touch they are ready. The first one was a bit like playing ‘Hot Potato‘ and was gingerly juggled between hands until it had cooled down enough to handle!
However, once I opened the tin I immediately noticed a difference. The paint mixed excellently in the tin as well as in the cup with the thinner, and when I went to spray … Amazing! I had never sprayed anything like it. I’m not sure of the science of it all, but the flow of spray was perfect and I found I had absolute control of the paint. I had to try it with Xtracolor! After taking about an hour to spray the camouflage pattern, occasionally heating it up by holding the hair dryer under the paint cup on the side of the Aztek, I went back to the Xtracolor Light Stone.

ABOVE: If anyone ever asks me why I like the Aztek here is your answer. Aside from the tracks being masked lo keep things easy, there were n0 masks used 0n this model and all of the camouflage was done freehand. With a good mixture and PSI, I can write with my airbrush. it.
I needed to fix some of the over spray from the first attempt with the Humbrol Terracotta mixture, and found that the heated Xtracolor sprayed with even better characteristics than the Humbrol mixture if you can believe it. I will be spraying my paints after heating them from now on, and the onJy time I would y it wouldn’t be necessary would be on the hottest of summer days. Alter several passes on the over sprayed sections of the model (and a couple returns to the Humbrol mixture alter messing up a couple of times) the model was ready for its gloss varnishing, in preparation of the newly arrived custom made decals.
‘Doing’ the Decals
It was looking like being a difficult task to source and or create the decals that would be needed for this vehicle. The registration numbers would be no trouble as I had a sheet of Modeldecal RAF 1 :72 scale black numbers and letters for just such an occasion. This sheet has come in handy for several models, and as the sheet has plenty of each number and letter, will come in handy for some time yet.
However, I was not looking forward to hand-painting THE GEORGE across both sides, as well as finding the insignia for front and back. This is where Ken comes in. He kindly produced a sheet for me to use, although it was a lot of work to get it right. Producing it on a computer Ken used a graphics programme (Adobe Photoshop) to rotate and transform the original photograph so the words across the side could be taken from the original black and white photo, scaled to the correct size, then printed onto decal sheet. The first attempt went a bit white on us for some unexplained reason, (probably the decal paper for inkjet printers was a bit ‘old’) so it was up to Ken to have another go and print out on some different Hannant’s clear decal film, and up to me to see if I could get it on the model.
After applying the newly done decals they needed to be painted over with yellow to give them some visibility because of the weakness of inkjet printer yellow inks. Unfortunately, my tracing abilities aren’t what they were in the fourth grade so they do not look perfect, and more closely resemble the work of a drunken squaddie rather than the actual artwork supplied as a decal by Ken. Overall though, you can see the experiment worked out in the end, and I owe a pint to the Editor of this magazine [Military Modelling Magazine] for going well above and beyond the call of duty.

ABOVE: Some people like to attach, all of the tools and details then paint, but I prefer to do it separately as it makes life easier. It may n0t make for a pretty picture, but it works a charm.

ABOVE: About midway through the weathering stages and granted, things are not all that pretty, but they will come together later, I hope. This shot illustrates just how much detail a wash can pick up.

ABOVE: I recommend a slightly more sturdy method of removing excess oil wash, as my Tesco cotton buds were clearly not up to the task. Actually this is a pretty shocking picture!
Finishing touches
At this point I added the nice surprise included with my tow cables. In my rush to order the part from Model Point I failed to notice that included with the tow cable was some machine gun barrels and perforated barrel sleeves.
I can honestly say that these are some of the most impressive add-on parts I have ever seen. I immediately cut the kit machine gun off its ball mount, drilled out the space and slotted the piece in. As you can see from the photographs the result from about 10 minutes work is stunning.
For the price I cannot recommend this set highly enough. No Sherman fan should be without it. Now if the cable was ready to use like Hudson and Allen, Karaya could name their price for this set and I would have it. All of the tools were added to the tank, and while they are not my best effort in the wooden replication department, I think they look pretty good. It is a constant process of experimentation when it comes to tools, for me, and as I keep no notes on previous methods used and thus I do not make my life any easier.

ABOVE: Even worse than the last picture! I hate the way my models look when they are glossed. A necessary evil unfortunately.
Weathering Well
My favourite part of building a model is the weathering stage, as it gives me the chance to really be artistic with it. While there are set ways to create certain effects in the building phase of any kit, it is not until the model is weathered that any sort of artistic expression can be used, at least as far as I am concerned, to create enhanced realism. The first to go on is the oil wash.
I have experimented with several types of wash, and even thinning weathering pigments, but always find myself back at the same place – my trusty Winsor & Newton oil paints. Why not use weathering powders as weathering powders, as they were intended to be used rather than messing about trying to make something do something that I already have something to do something with? Makes sense to me.

ABOVE: I used 1:72 scale numerals from Modeldecal for the numbers. They look perfect for 1 :35 scale tank numerals and even though, Ken doesn't agree with me, I think they look like the ones in the photograph. (Of course he's probably right. Grumble, grumble.)

ABOVE: You can see where I knocked off the stringer rail during decal application in this picture. But isn't the Karaya tow cable nice? It was painted using Alclad steel.

ABOVE: Not the best job I have ever done 0n tools, and I wouldn't say my experiment with oils for wood was a complete success, but there is potential and with some practice I think I can crack it.
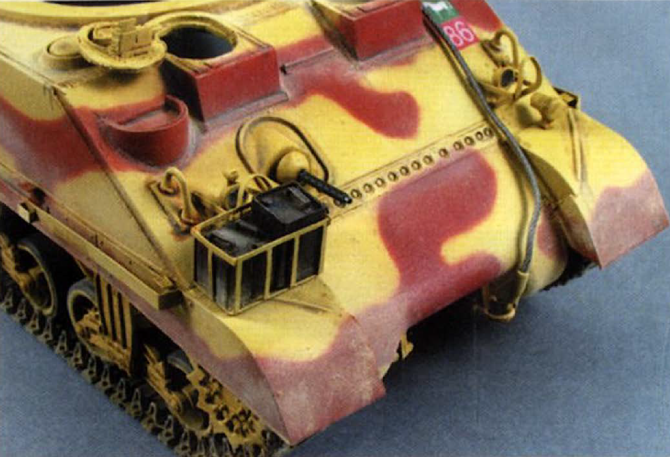
ABOVE: Once again it is CMK Stardust pigments to complete the weathering process, and I find myself relying 0n them more and more. I used a combination of dust and sand here and am very pleased with the finish,.

ABOVE: Slightly better from a distance the finnish is starling to come together. By looking closely you will see that distinction between camo colours is improved, as I have gone back over the edges with Xtracolor before glossing.
Final Thoughts
As you have no doubt by now noticed, I opted for ‘the crew did an amazing job on the dummy gun’ option for the barrel, and I strongly feel that it doesn’t in anyway take anything away from the appearance of the model I used a vast array of resources to build this model, although I am sure most Sherman builders will be in the same situation as me, with plenty of kits lying about with a part missing here, and some tools missing there …
Inevitably there will be one or two small issues when it comes to accuracy, as I can’t imagine anyone building the perfect model and getting every detail right, and no doubt ‘the usual suspects’ will write ‘Despatch’ letters page lectures on what they are, but have worked from a few photographs on this model and am very pleased with it. This is due, in a large part, to the efforts of Ken Jones and Peter Brown who helped me to make what I feel is a very accurate representation of a very interesting vehide.
To these to men go a great mention of thanks, as building this model to this level would not have been possible without their help. So Peter and Ken … Cheers! As far as the models that went into this project are concerned I can say that I was very pleased with both. The TRAKZ conversion has it’s low points, but overall its a good rendition of the M4A2 and with skills superior to mine could be made to look incredible. The Dragon kit is a state of the art box of plastic, and will prove invaluable in the stores of any Sherman fanatic. The bounty of accurate and well-detailed parts will come in very handy.
The positions of tire Arm of Service markings 0n the rear plates was determined from examples observed 0n film clips of the Brigade's tanks 0n a parade 0n 22nd October 1943.

ABOVE: I had nightmares with the lettering and unfortunately this was the best I could come up with. I feel badly about it as Ken spent a lot of time working 0n the decals to get them right for me, but as they needed a deeper colour l had to paint yellow 0n top of them. My hands are not as steady as they 0nce were ...

ABOVE: The engine deck completed, and I think I may have overdone the dust 0n the fuel stains and they have become lost.

ABOVE: The Royal Wiltshire Yeomanry were in 9th Armoured Brigade which was the armoured brigade in 2nd New Zealand Division at El Alamein. Only those British units that served in 2nd New Zealand Division were granted official permission to carry the Division's fern leaf badge on their vehicles to commemorate that service. This badge appears as the little black square over the letter G on the vehicle's name.
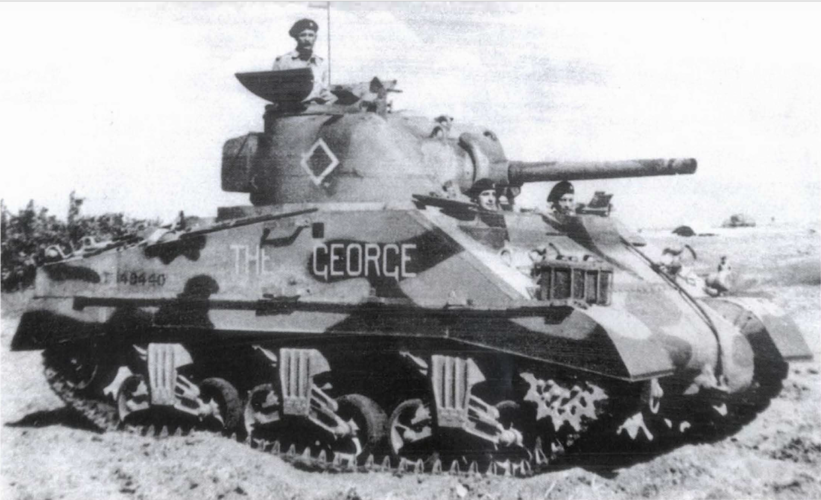
ABOVE:: THE GEORGE Sherman Mark Ill T149440, RHQ Troop, Royal Wiltshire Yeomanry, 9tlr Armoured Brigade, Syria 22nd October 1943. The Regiment named its tanks after public houses and place names in its home county of Wiltshire. (IWM)
Sources and References
The following kits went into this model…
- Tamiya M4 early (dust skirts, transmission cover bolt plate.)
- Dragon M4A2 (as the donor kit for the basis of he conversion.)
- Academy Achilles M10 (wheels and pioneer tools.)
- AFV Club Achilles M10 (drive sprocket.)
- ltaleri Crusader Mark I (rear turret storage bin )
The following aftermarket accessories went into this model:
- Karaya KYTCR03 Sherman tow cable..
- Aber ABR35032 Sherman M4A 1 etched set. Eduard ED35474 M3 Grant etched set. Accurate Armour TIS
- Trackpax type 61 British Chevron.
- Accurate Armour A005 British WWII POW cans.
- Jordi Rubio JR3517 Sherman 75mm gun barrel.
The following condiments went into this model:
- Xtracolor X821 Light Stone.
- Humbrol 100:70 in ratio 6:5 as per Mike Starmer’s recipe for Terracotta taken from the MAFV A UK Web page.
- CMK Stardust weathering pigments CMKSD03 Sandy Dust; CMKSD07 Light Dust.
- Winsor & Newton’s Raw Umber artists’ oil paint.
All of the above items came from: Hannants,
I Harbour Road,
Oulton Broad,
Lowestoft,
Suffolk,
R32 3L2, England.
Tel: 0044 (0)1502 517444 or 0845 130 72 48
www.hannants.co.uk


