Graham Dixey’s series:
Oil Painting for Beginners.
Here, he describes and demonstrates
the sequence for painting the face
of a miniature figurine
In the previous article in this series we discussed various ways of mixing up what are loosely known as “Caucasian” flesh tones. I also dealt with the way in which a tone is modified for painting the shadow and highlight areas of the face. and also mentioned other colours that we would use to paint in the details, as well as fo.r giving the face more life.
What I did not describe then was the actual painting sequence in detail. This I am now going to do. What follows is, of course, just one man’s way (mine) of approaching j the task, but l.f your experience of painting faces Is limited, then the least that it should do is to provide you with a guaranteed method for getting a satisfying result. Eventually you will modify your first method as you gain experience and talk to other people.
My first reference for painting a face in oils was found in a very early edition of the Historex catalogue. This was an article by Lynn Sangster which gave me an understandable and logical approach to the subject. l have always valued this first piece of advice; how I would have managed without it In those early days i do not know. l hope that I can provide a similarly useful reference for the beginner in this article.
I am being assisted in this task by the Jolly “squaddie” In the illustrations, whom I have called Fred. The reasons for his high spirits are twofold: first, he is “dead chuffed” at being asked to appear in this prestigious series; the second reason is that he gets demobbed tomorrow!
What I hope that you might observe at this stage is that, as you look at the pictures lettered A to E. his face acquires both depth and life. What I propose to describe are the five stages in the sequence that cause this to happen. If have convinced you so far. read on; if I haven’t. read on anyway and maybe I’ll have another go at enlightening you.
The Palette
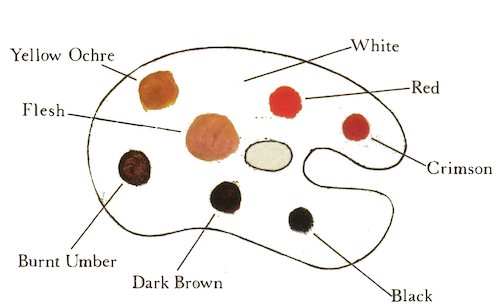
The observant among you will also have noticed on the opposite page. a curiously shaped object with daubs of colour on it. This is an artist’s palette of traditional shape. No. don’t rush out and buy one!
This is merely an artifice to act as a background for the selection of colours that I shall be t1sing in this demo. The term “palette” is used loosely here and can equally be applied to that scrap of card, a lid or old tile, or whatever it is that you put your oils out on ready for the session.
In this case, the names of the colours should, by now, be like those of old friends, since they have all been mentioned before. Only two of them are “mixed” colours.
These are the “flesh” col0ur and the dark brown. The first was the main subject of last [my last] article and in this case is produced by my usual, and for me most popular method of mixing yellow ochre with white and adding a spot of red to liven it up. This was discussed [in a previous issue], but here is a recap.
Put out a little white and add to it rather less than the same quantity of Yellow Ochre; mix. well and then add just a little and possibly a tiny bit more of red (the actual red is unimportant) until you have a flesh tone that has a decidedly “pinkish” cast without being at all doll-like.
This is the basic “flesh” colour shown at the centre of the palette. The other mixed colour is the dark brown, which is obtained by adding a little black to the Burnt Umber to give an extra shading tone. Right. now to proceed to stage A of the painting sequence…
Stage A –

The Basic Flesh Colour
Having mixed this up, it has to be applied in an absolutely even coat to the face. It may be applied directly over a white primer or onto a flesh primer: such as an acrylic or enamel flesh paint. Either method can be used satisfactorily and I have used both at times.
The advantage of priming with a flesh colour first is that the resulting flesh colour, once the oil paint has been applied. tends to be rather deeper. It would be a natural question for a beginner to ask. “why use two flesh colours one on top of the other. why not just use the flesh primer?” The answer to that is … when we add the shading and highlighting tones later, we need to be able to “blend these into the flesh colour so that there is no sharp division between the different tones.
So, as you may now have registered, the flesh primer gives depth to the final colour (and is quite dry when the oil colours are painted over it). while the oil flesh colour remains wet for long enough to allow the blending to be carried out.
A common the blending mistake that beginners to oil painting make is to apply too thick a coat of paint to the surface of the model. This is true whether painting a face or any other part of the figure or its uniform. If this happens take a dry brush and use it gently to lift the excess paint off, drawing the hairs through a dry cloth each time.
This same brush may be used to smooth out the· remaining paint so that no brush marks remain. A “stippling” action helps in this respect.
For this reason use quite a largish brush, such as a No.3-5.
Stage B –

Shading Colour
Diagram B shows the areas. where the shading tone should be applied. Essentially, they are wherever the surface turns away from the light or is partially or completely shielded from it. Under the hat. in the eye sockets, under the nose. lips, chin, etc, are the obvious places.
The shading colour used in this instance is Burnt Umber, which is applied to the areas with a reasonably small brush (0- 1) and then blended in with a dry brush.
To blend, use the dry brush on the junction between the two colours to cause them to merge. Restrain the action otherwise you may just produce a large area of mud! Remember that if you make a mistake with oils. it is easy to go back to square one, just by wiping everything out with white spirits, drying it off and having another go.
Stage C –

Highlights
Diagram C shows where to highlight the face. The logic here is the opposite of that for shading (naturally!) and the areas chosen for the highlighting. treatment are those “closest to” the light. Note where they are: the forehead. the ridge of the nose and the nostrils, the cheekbones and the chin. mainly.
It is also possible to highlight the tops of the ears; in fact, the details of the ears (if they are cast well enough) can be enhanced by shading and highlighting the “hills and valleys· of these organs. Highlights should also be blended.
The highlighting can be carried out by brushing very little white .into the highlight area and using the blending process to create a gentler pink. almost white. tone. It takes practice, but don’t give up. An alternative is to allow the basic flesh colour to dry, more or less, and to paint the highlights. not with pure white, but with a flesh/white mixture – the actual highlight colour – using a dry brush to blur the edge of the highlight later.
Stage D –

Lips and Cheeks
Taking the lips first. I usually take a little Crimson and add this to some of the basic flesh colour. This is then used to paint the lips If full strength crimson is used it will look totally wrong, more like bright lipstick – but fine If youre painting “Phoeinx Phollles”. of course!
The colour of the cheeks can be “lifted” slightly by adding a little red to the flesh colour and painting this onto the cheeks. At first it may look a little too strong, but lightly brushing it with a dry brush will lift some off and blend the rest in. This definitely gives more life to the face and is not as unrealistic as might be thought.
Stage E –

Eyes and Hair
Painting the eyes deserves a separate article (which it will get [soon]) so for now I will say, try to restrain yourself when painting the eyes. Don’t put a great blob of black smack in the centre. Use either a mid-brown (Burnt Umber plus Yellow Ochre) or a simple grey (black/white mixture).
I shall deal with the sophistications [soon]. Leave a little white only showing at the edges and let the iris disappear below the lower eyelid.
The only hair on this figure is the moustache. This was painted overall in Burnt Umber to start with. Then it was highlighted (the entire upper region) with Yellow Ochre. and finally the dark brown referred to earlier was used to shade it on the underside. You can. of course, avoid mixing the dark brown by applying the black paint directly to the moustache and gently blending lt in. Well, that concludes my •five-stage demo”.

Reproduced with kind permission of: Doolittle Media – www.adhpublishing.com/
First published in Military Modelling May 1992


