Charles Buchanan’s

In the second part of his new series for figure modellers Charles Buchanan discusses ‘gait’
In the previous article I discussed the importance of taking a body’s centre of mass into account when planning a figure’s pose. I also discussed a few related anatomical matters, where the pose of your figure warrants the addition of backpack, ammo pouches, weapons, other military stuff, and how stance is adjusted according to this added mass. Taking it to the next step I now wish to deal with gait: the subject of this second article. As bipedal creatures we all get around with our legs, and those of us using the human form in our art incorporate gait, capturing still 30 images of some military event.
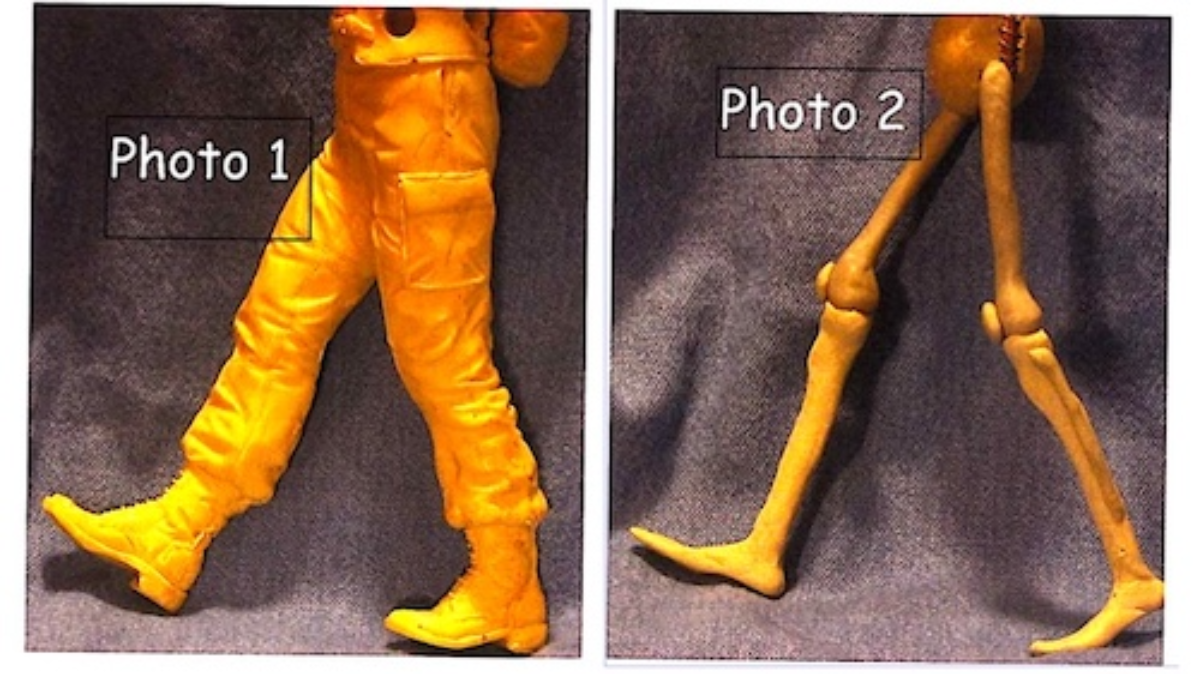
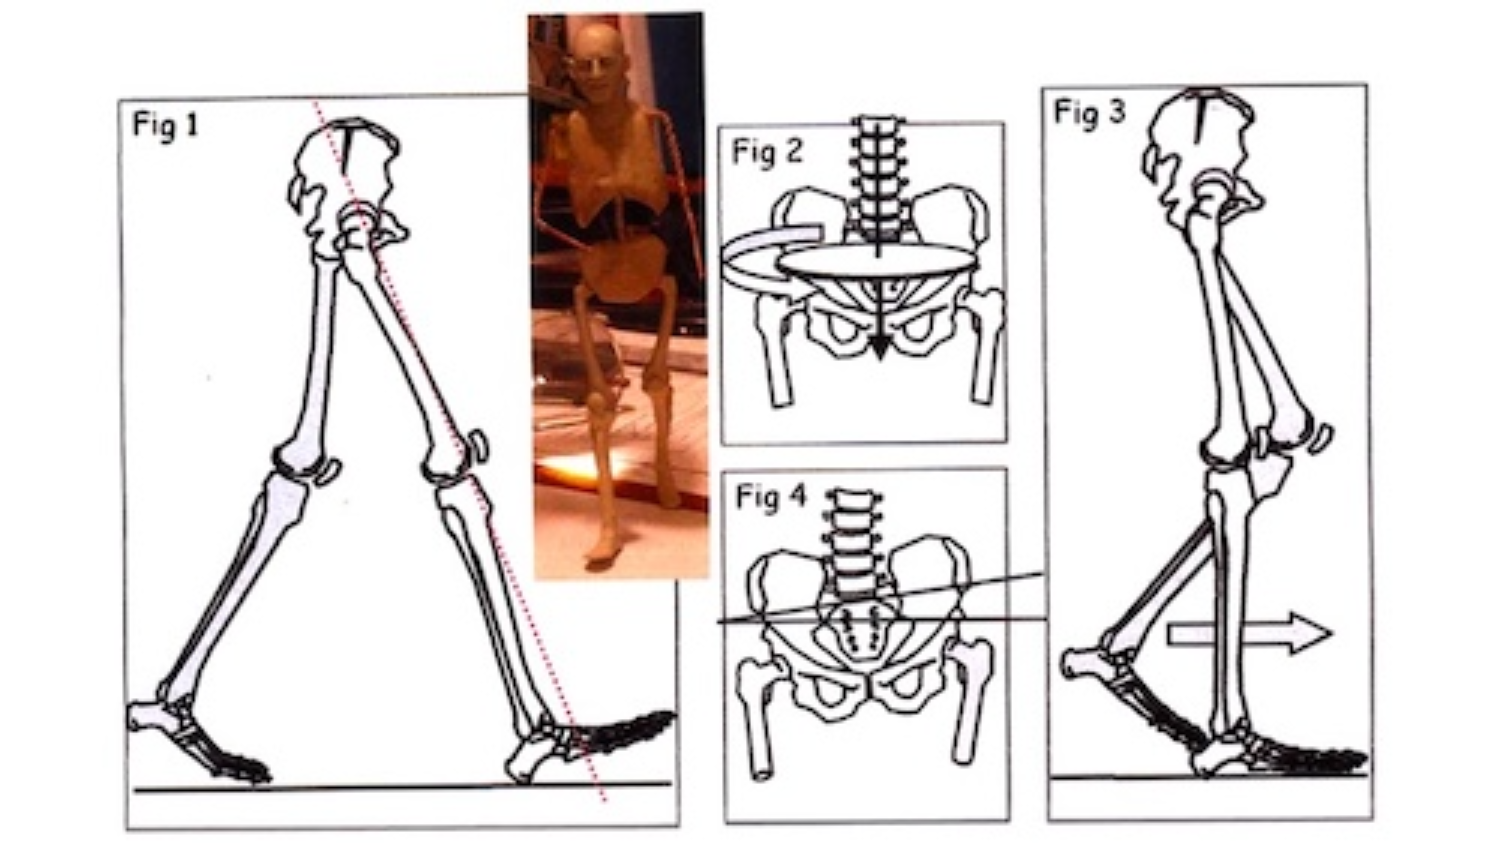
Walking, jogging and running (ambulation) are not as simple to transform into an artistic statement as some would imagine. Like the upright stance burdened under load, a separate rule exists for gait, this being broken down into distinct phases. How can this be applied to our art form you might ask? Again the answer is quite simple so to repeat myself, ‘good animation of the human form is essential if your work is to be seen as eye catching and first-rate.’ Mood also goes into this, but I digress. We’ll deal briefly with a single gait cycle, taking into account the fact that ambulation is simply ‘forward falling‘. What this means is that when we walk our legs never straighten so that our knee joints don’t lock, but we don’t collapse because of forward momentum. Take a look at the photograph of the unpainted resin figure (Photo 1).
Although walking pace of this piece was sculpted to denote a soldier hurrying along, the knee is fully extended, which is incorrect as there should be a slight bend in the joint. You can see this in Photo 2, which denotes basic leg bone sculpture, which I will flesh out later on.
The first phase of gait is called heel strike, a point where the heel of the forward-most foot comes into contact with the ground, (Fig 1). Remember, the knee isn’t locked, so employ a slight knee bend if you are sculpting this and all other gait phases.
Pelvic rotation occurs during the cycle in that the pelvis swivels 4-5° about a horizontal axis, resulting in increased stride length, (Fig 2).
If scratch-building, tilt your pelvic armature area forwards by about 4-5° then flesh it out. The second phase is called mid stance, (Fig 3) a point where the entire bottom surface of the foot is in contact with the ground, while pelvis rotation sits in neutral, but with an upward 5° of pelvic tilt on the opposite side. This is called hip,hiking and unconsciously done to assist us in keeping the swinging foot off the ground, (Fig 4).
The opposite foot now swings through, (Fig 5) the first acting like a pendulum as it propels the body forwards. Once again the pelvis swivels 4-5°, this phase encling with heel strike of the opposite foot.
Phase three is push off (Fig 6), the toe and calf muscles acting like released springs as they begin to push the foot off the ground.
Phase four, toe off, occurs when the toes accelerate this motion causing the foot to leave the ground.
The leg is now in phase five, called mid swing, with pelvis rotation on a horizontal axis at neutral, but with an upward 5° of pelvic tilt, (Fig 7). It’s hard to notice hip-hiking when watching regular folk walk, but you’ll easily see it when observing people who wear leg braces or artificial limbs.
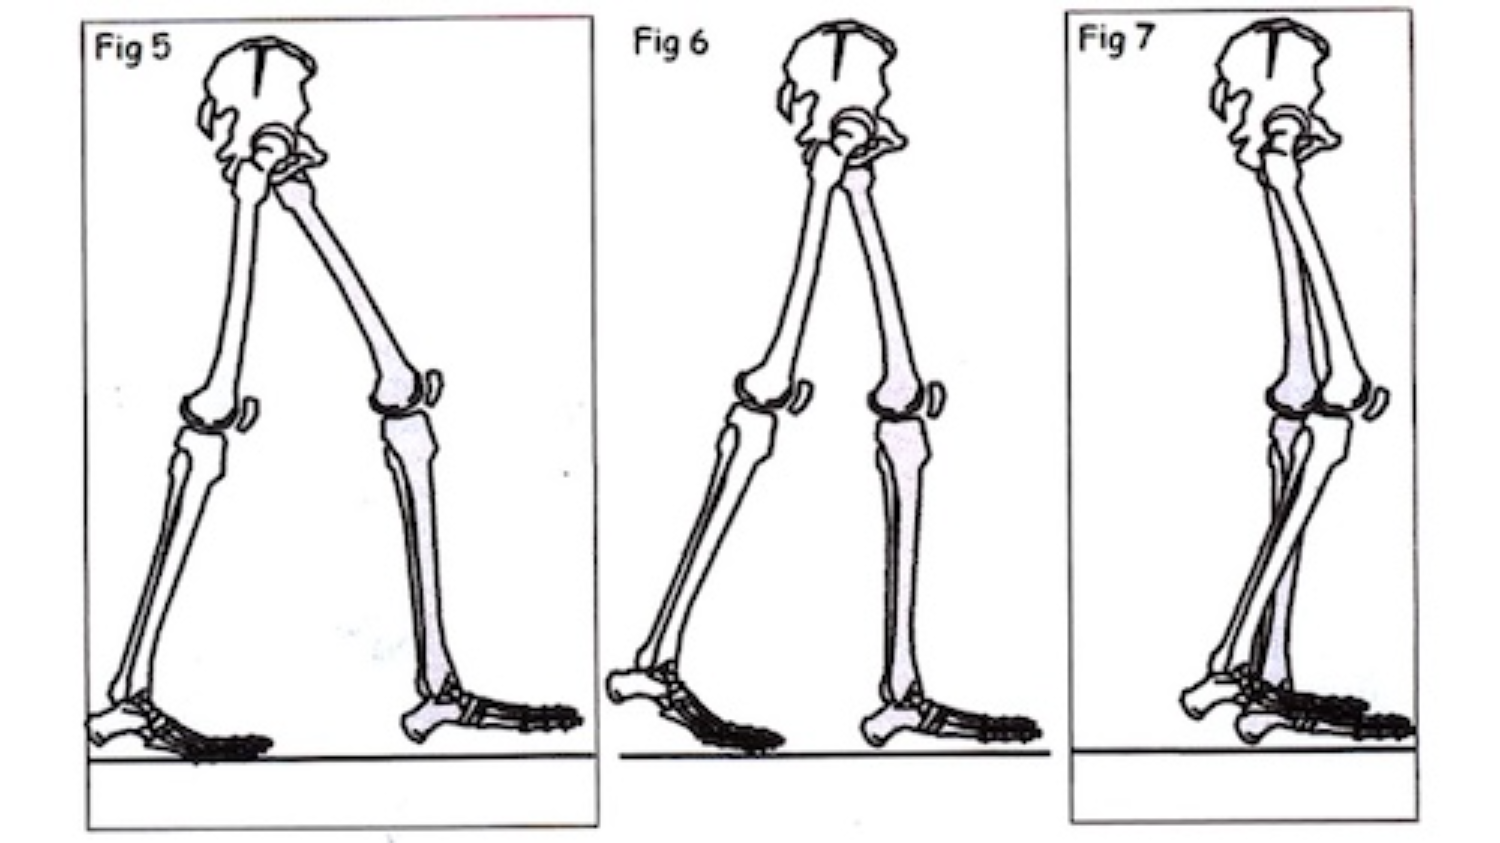
One gait cycle is thus complete, another about to begin. This is all quite a mouthful I’m sure, as we take ambulation for granted, but in our art form it’s still important as it helps give your figures life. Most military sculpture captures soldiers posed in the heel strike phase, because it provides double support, but if you’re at all adventurous consider using mid-swing phase as an option, (Fig 7).
Think about it, combined with other phases your figures could create a scene of incredible diversity. Because proportion is so important to me, I always sculpt basic leg bones before fleshing them out, adcling clothing and boots afterwards.
My armatures are, therefore, based on the human skeleton, with chest and pelvic cavities filled to form underlying pelvis and rib cage shapes, (Fig 9).
Depending on my mood I will then model a basic head, taking great pains to ensure scale is correct, as it’s a common fault with many of us to sculpt heads first, some of which tum out to be too large for their bodies, making them resemble adult heads on children’s shoulders. I, therefore, always encourage beginners to model heads after most of the nude figure is complete.
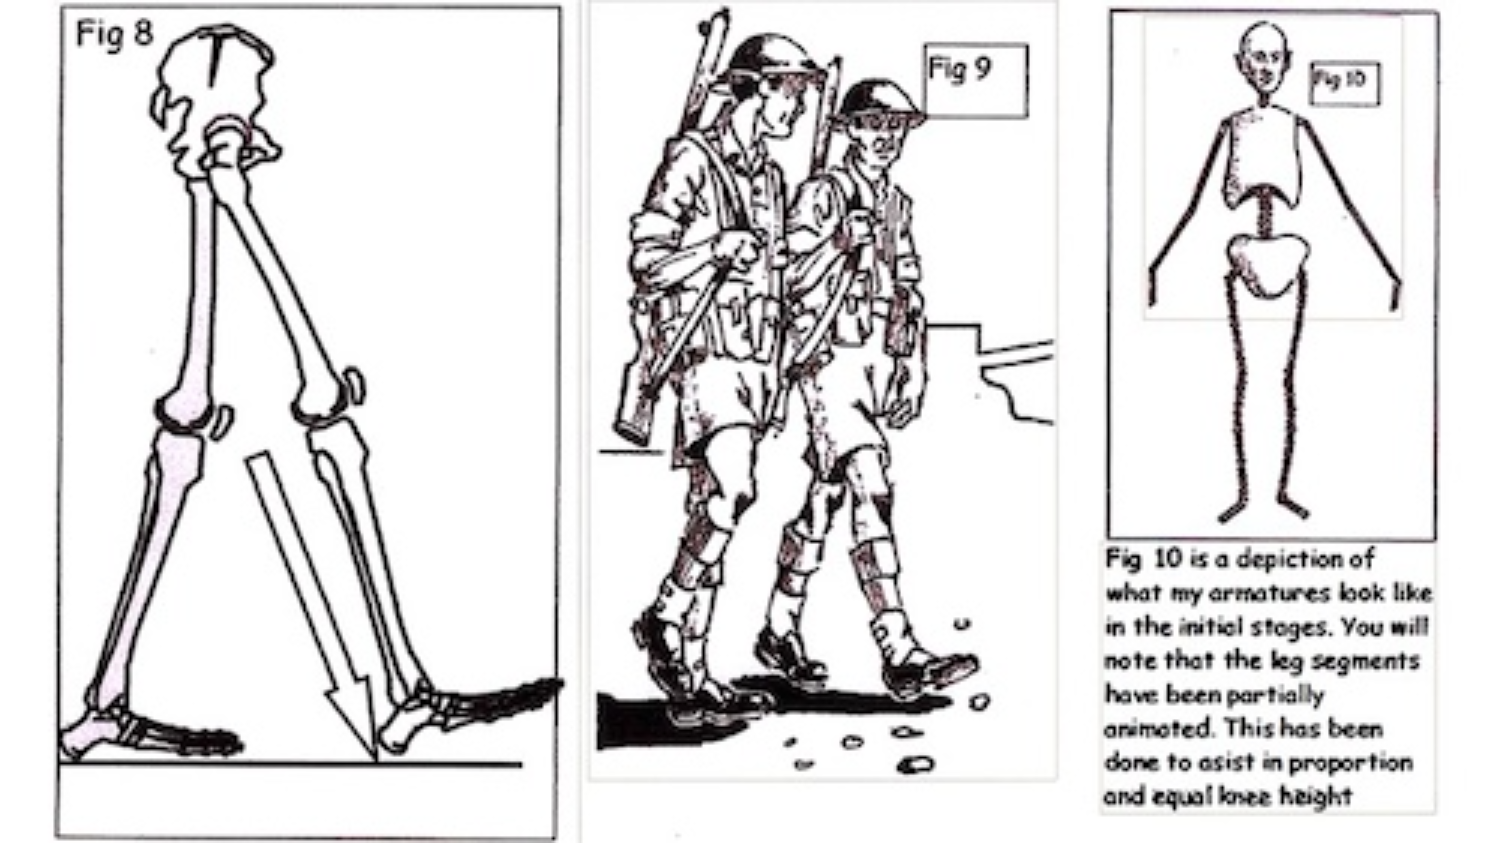
Arms and hands are generally the last to be done, as they are usually posed grasping weaponry over underlying detail, such as belts, pouches, straps and so on, difficult to sculpt when arms are in the way. Once complete, animate your armature’s leg wire into the necessary gait phase, remembering not to forget pelvic rotation and hip-hiking tilt. If your figure is to be modelled under load, rotate the trunk slightly forwards at the hip joint, drawing an imaginary plumb line from the centre of mass, down through the weight bearing foot to ground, (Fig 11). It is always best to do this whilst looking at your figure’s profile.
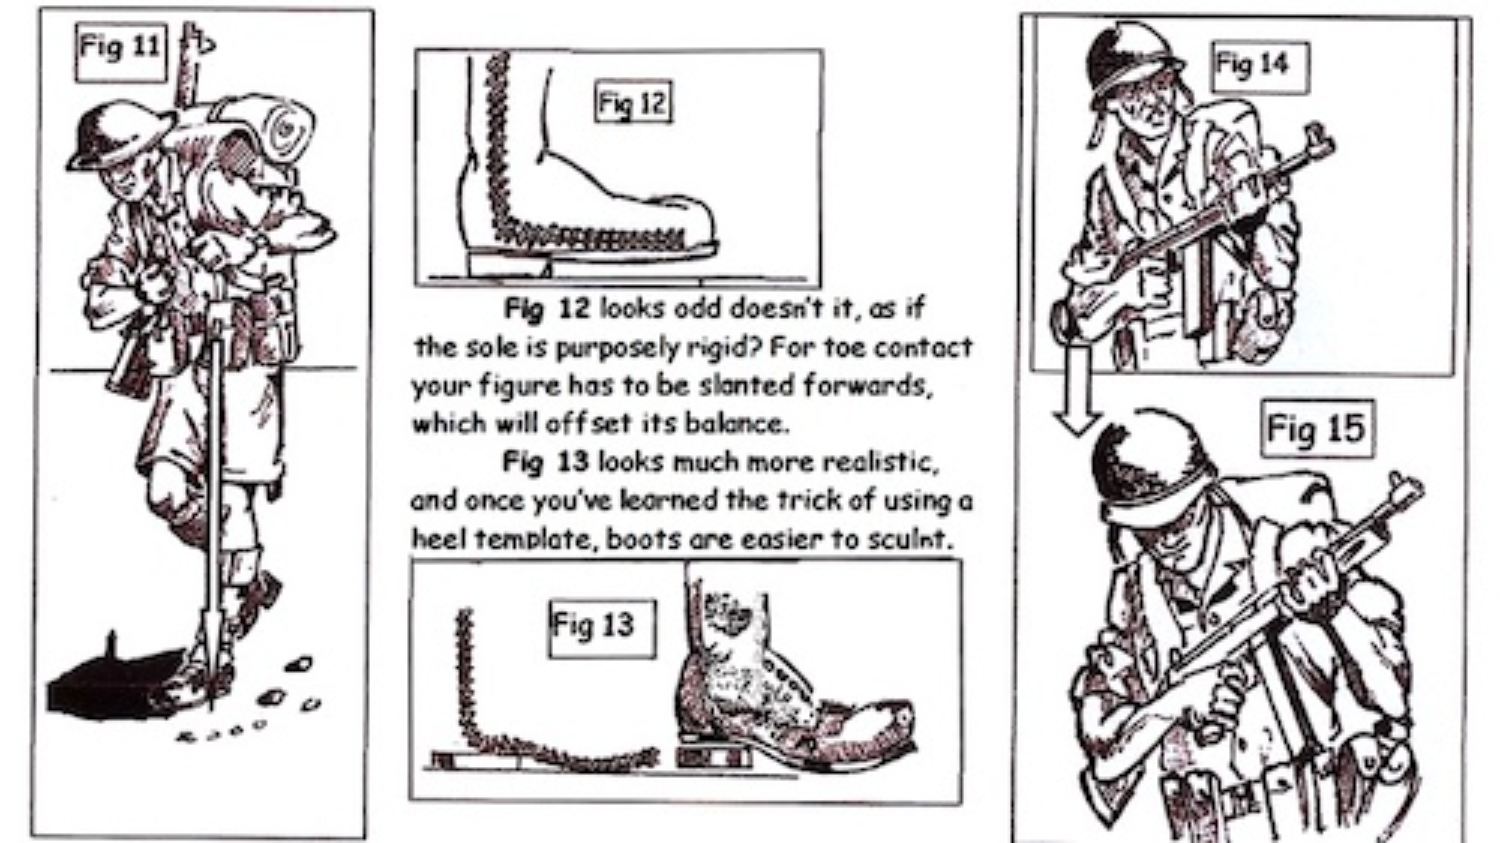
A word of caution here, what kind of footwear will you figure be sculpted wearing?
Take this into account now because if boots are to be modelled, heels are needed. If you don’t bend the forefoot segment of your armature to accommodate heel height, adding heels as an afterthought will throw four figure forwards by a fraction, moving its centre of mass in front of the chest area, (Fig 12). I’ve found that the best way of overcoming this is to decide in advance what heel height is required.
Make a heel template then bend the forefoot section of your wire armature down over the template to ground, (Fig 13). When modelling the boot, add its outer sole and then add the heel. You’ll notice immediately that the difference between the two is as disti11ctive as it appears in the drawings. Now you are ready to flesh out both legs, groin, buttocks and torso.
Refrain from fleshing out the neck, as a loaded stance will often dictate how the neck will be posed upon the shoulders, (Fig 14). It also gives you the chance to further animate neck wire if you’re unhappy with your original choice of head pose, (Fig 15).
In conclusion, you can now sculpt clothing, footwear, packs, weapons, arms and so on, or go to town so to speak. I hope this has been of some help and that your work stands out, so much so that you are honoured with these remarkable words I once heard uttered by some kid’s irate father, “Johnny, don’t touch!” Reference to any person living or dead is purely coincidental.
By kind permission of Doolittle Media. Originally published in Military Modelling
